


Available Licenses
Adding a device
Assigning a license
Transferring a license
Export
Device Licenses and Services
Adding a new customer
Delivering device entitlements
Transferring a device
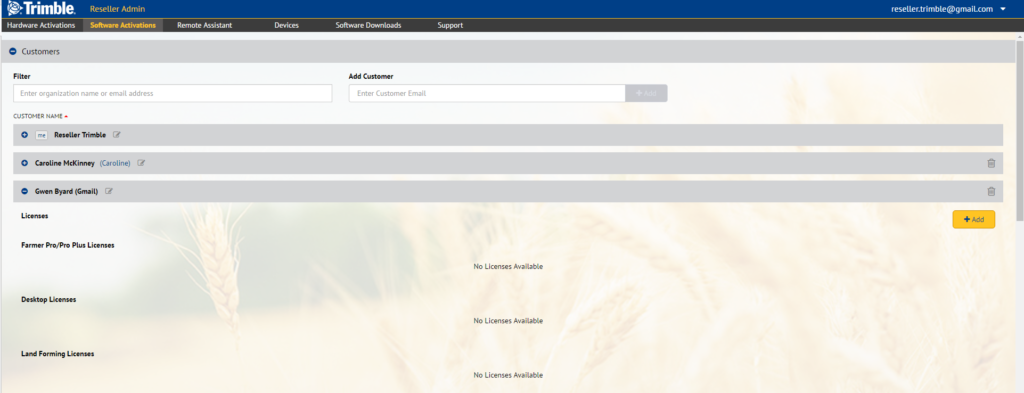
Software Activations
Assigning a license to a customer organization
Assigning a license to a customer
Devices screen
Upgrading a DCM-300 modem
Software Downloads
Downloading a new version of the software
Irrigate-IQ Management
Adding a new customer organization
Adding a new pivot
Creating a pivot spreadsheet
Setting up a new pivot
Editing pivot properties
Adding overhangs and corner arms
Configuring a controller
Commissioning a pivot
Importing a shapefile
Product overview
The Ag Reseller Admin website is designed for use by Resellers and is used to manage common administration tasks, including the following:
- View the devices in your organization and your customers’ organization, including the TMX-2050™ display, MMX-070 display (where available), DCM-300 modem, FmX® integrated display, and the CFX-750™ display.
- Assignlicenses. Licenses are typically permanent and have an unlimited duration. They are activated on the Ag Reseller Admin website to TMX-2050 and MMX-070 displays from theHardware Activations screen. You will be able to:
- Track the pass codes (licenses) andservices. Services have an active duration period. They must be activated on the Trimble Store by device serial number.
- Deliver device licenses and services.
- Keep track of any expirations and issue demos without having to wait on Trimble staff.
- Associate licenses to the appropriate display number.
- Transfer devices to a customer organization.
- Download TMX-2050 software. SeeSoftware Downloads screen.
- Launch Remote Assistant for the FmX integrated display. SeeRemote Assistant screen (FmX integrated display only).
- Upgrade firmware for the DCM-300 modems over-the-air.
- Link to the Trimble Support page to access existing cases or create new ones.
- Assign Landforming licenses.
- Assign Farmer Pro/Pro Plus (bundled) licenses.
- Add or remove customers and manage their devices.
- Add a device.
You can access the Ag Reseller Admin site through any Internet browser such as Microsoft® Internet Explorer®, Apple Safari, Mozilla Firefox, or Google™ Chrome.
Screen layout
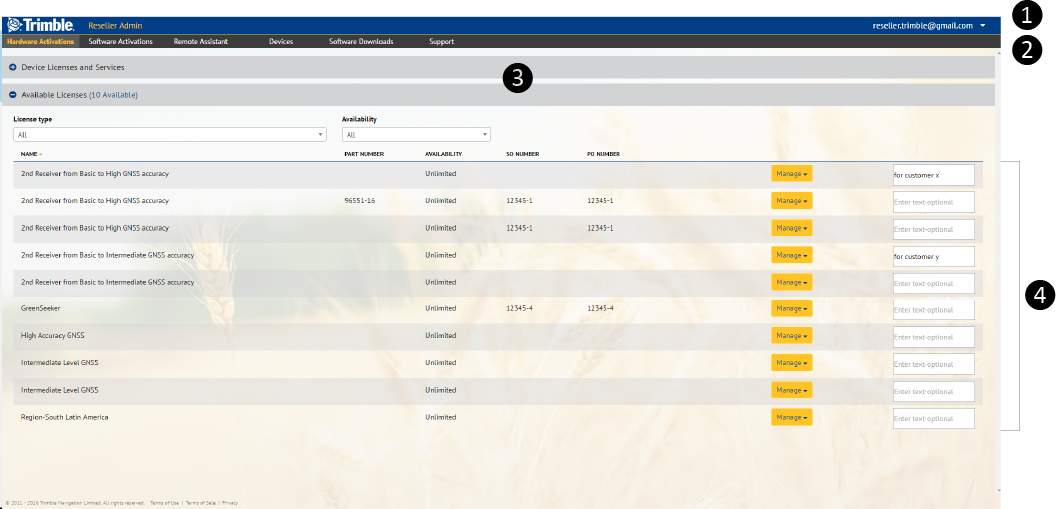 Description
| Description | |
|---|---|
| ❶ | Ag Software menu bar. This allows you to easily access the help documentation or logout. |
| ❷ | Ag Reseller Admin screen menu bar. This has the following tabs: Hardware Activations, Software Activations, Remote Assistant, Devices, Software Downloads, and Support.
Note: Support is a link to a login page. You will need your user ID and password to access this. |
| ❸ | Startup page (Hardware Activationspage). |
| ❹ | Expanded information. You can view more information in any screen by clicking the + icon next to an item on the left-hand side of the screen, in this exampleAvailable Licenses. |
Hardware Activations screen
 This screen allows you to access the following information: Description
| Item | Description |
|---|---|
| Device Licenses and Services | A list of all the assigned device licenses and services, grouped by Customer or by Device. SeeDevice Licenses and Services. |
| Available Licenses | A list of all available licenses. SeeAvailable Licenses. |
Available Licenses
This page shows a list of all the licenses that you currently have available to assign to a device or to transfer to another reseller’s organisation. From here, you can also assign a license. SeeAssigning a license.
Adding a device
Add Deviceenables a reseller to add a device to a customer’s organisation. A device can only be added if it does not already belong to another organisation.
- In theCustomerspage of theActivationsscreen, from theManage Devicesdrop-down list, selectAdd Device:
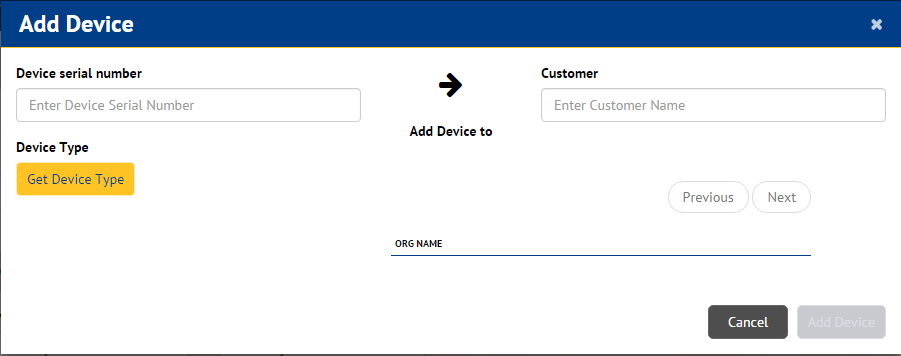
- Enter aDevice serial number. As you start typing the number, a list of options appears. Select the appropriate number.
- Select aDevice Typefrom the drop-down list.
- Enter aCustomername. As you start typing the name, a list of options appear. Select the appropriate name:
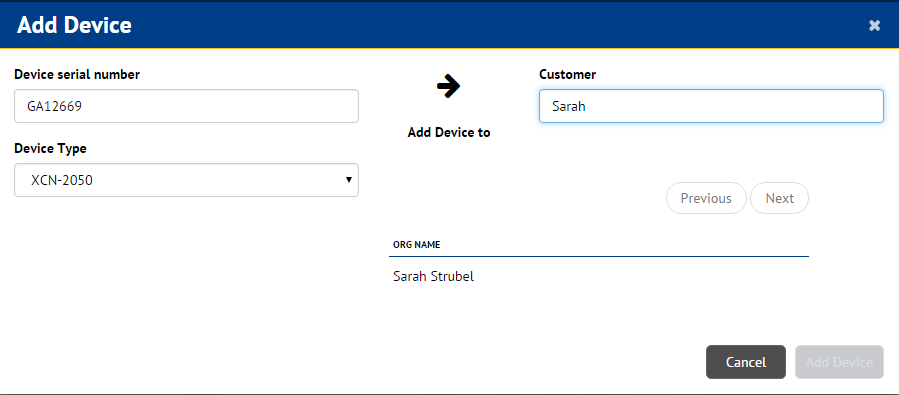
- ClickAdd Device.
Assigning a license
- Click the + sign next toAvailable Licensesto open the list of licenses if this is not already open.
- ClickAssignnext to the item that you want to assign.TheAssign Licensescreen appears. This shows theLicense type:
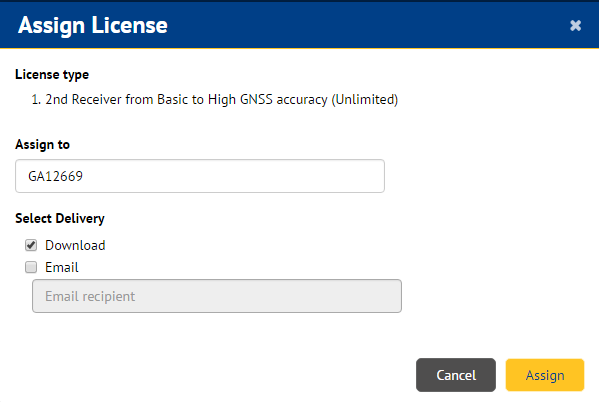
- In theAssign tofield, enter the device serial number that you want to assign the license to.
- Select a delivery method. The options areDownloadorEmail.
- If you selectDownload, the licenses can be downloaded to a USB drive and then transferred to the TMX-2050 display.
- If you selectEmail, you must also enter an email address.
- ClickAssign. The License will now appear in the Administration website with the device it was assigned to. A message, including both a QR code and an activation code is automatically generated and sent to the email address you entered:
Transferring a license
You can transfer a license to a sub-reseller or other reseller organization. To do this:
- On theHardware ActivationsorSoftware Activationspage find the license that you want to transfer. If required, filter byLicense Typesto help you find the license.
- From theManagedrop-down list next to the license you want to transfer selectTransfer:

Note –Licenses can only be transferred to an organization with Ag Reseller Admin site access.
- In theTransfer Toscreen, select the appropriateOrganisationand then clickTransfer:
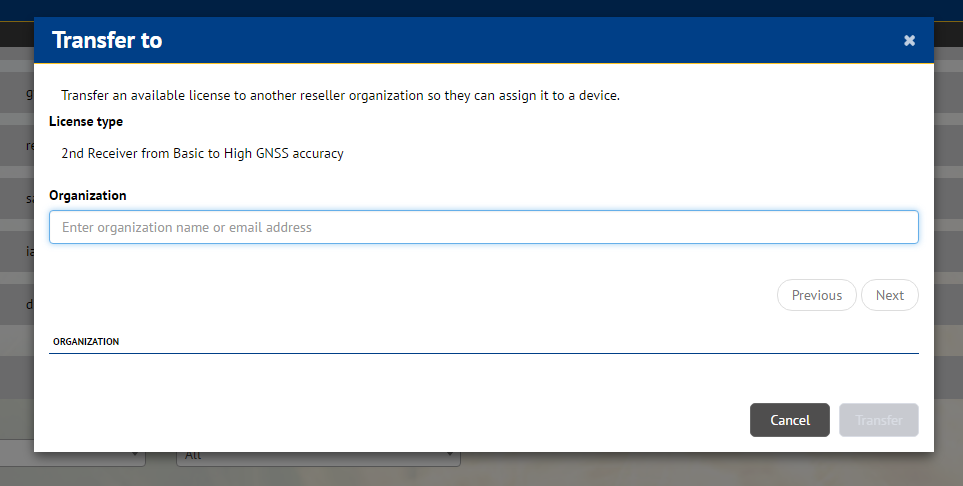
Note –Transferring a license does not activate the feature or “start the clock” on the license – it just moves an available license to another organization so they can then transfer or assign it. Assigning a license to a device or an organization activates the feature for that organization or device.
Export
You can export all device, license, and organization information from theHardware Activationspage to a csv format file.
- In theCustomerspage of theHardware Activationsscreen, from theManage Devicesdrop-down list, selectExport.
- The system creates a .csv file – this file shows in the bottom left of the screen, from where you can download it.
Device Licenses and Services
There are two views available – theCustomers viewand theDevice view. The views are explained in more detail below.
Customers view
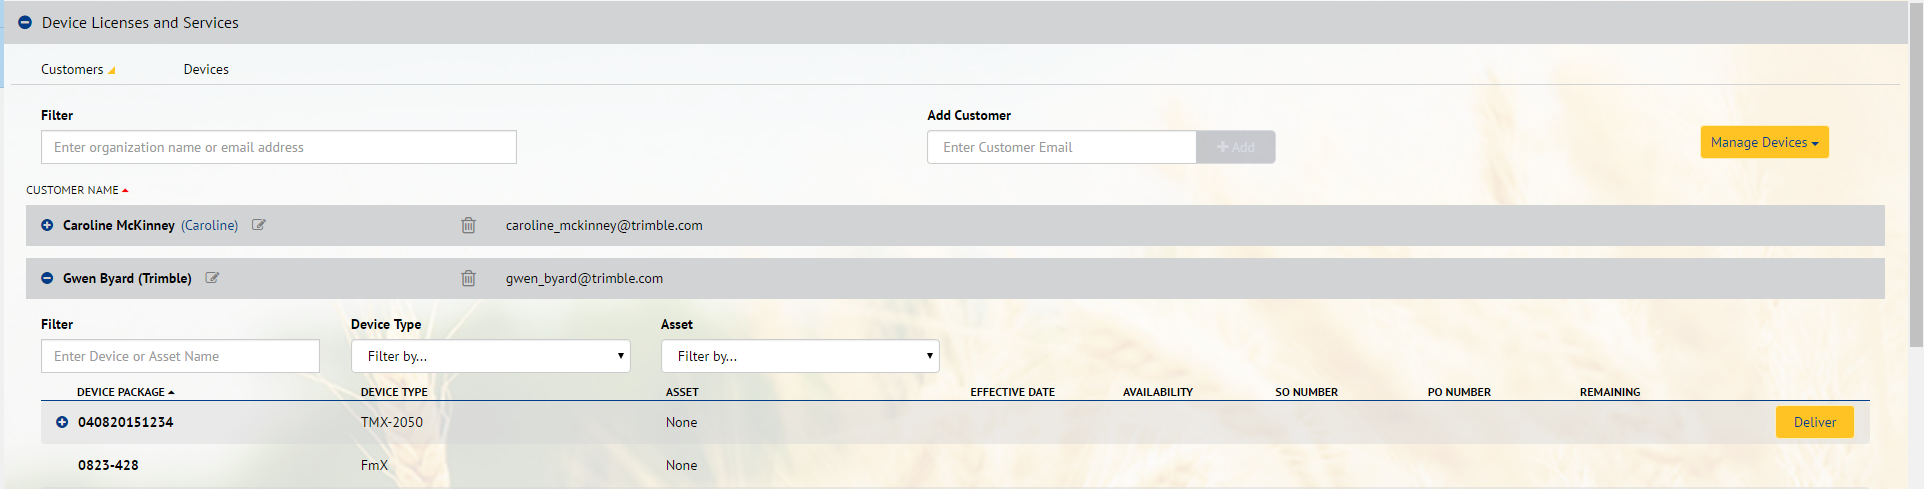 When you click the + sign to open theDevice Licenses and Servicessection of theActivationstab, theCustomersscreen appears by default. This screen shows the following information—to view more detail, click the + sign next to the customer name: Description
| Item | Description |
|---|---|
| Add Customer | Enables you to add a new customer. SeeAdding a new customer. |
| Manage Devices | Click the button to open the drop-down list. From here you can select one of the following:
|
| List of customers | A list of all your customers and your own reseller organization appears in this view. If you click the + sign next to a customer name, you can see a list ofDevices(CFX-750, FmX, TMX-2050, MMX-070 displays and the DCM-300 modem) associated with that customer. For TMX-2050 and MMX-070 displays, it shows aDevice Packagethat can be expanded to see more detail. If available, click the + sign next to aDevice Packageto see more details: Device Package information includes the following: Device Package information includes the following:
To deliver the package to a client or other recipient, clickDeliver. SeeDelivering device entitlements. |
Device view
Once you have clicked the + sign to open theDevice Licenses and Servicessection of theActivationtab, clickDevices: This screen shows a list of all Devices associated with a Reseller account. Click the + sign to see details of each Device Package. The following information appears:
- The name of each element of the package.
- TheDevice Type.
- TheEffective Dateof each element.
- TheAvailabilityandRemainingtime for each element.
- The Asset Name, if available.
- Purchase Order number and Sales Order number, if available.
- Optional text box for notes.
To deliver the package to a client or other recipient, clickDeliver. SeeDelivering device entitlements.
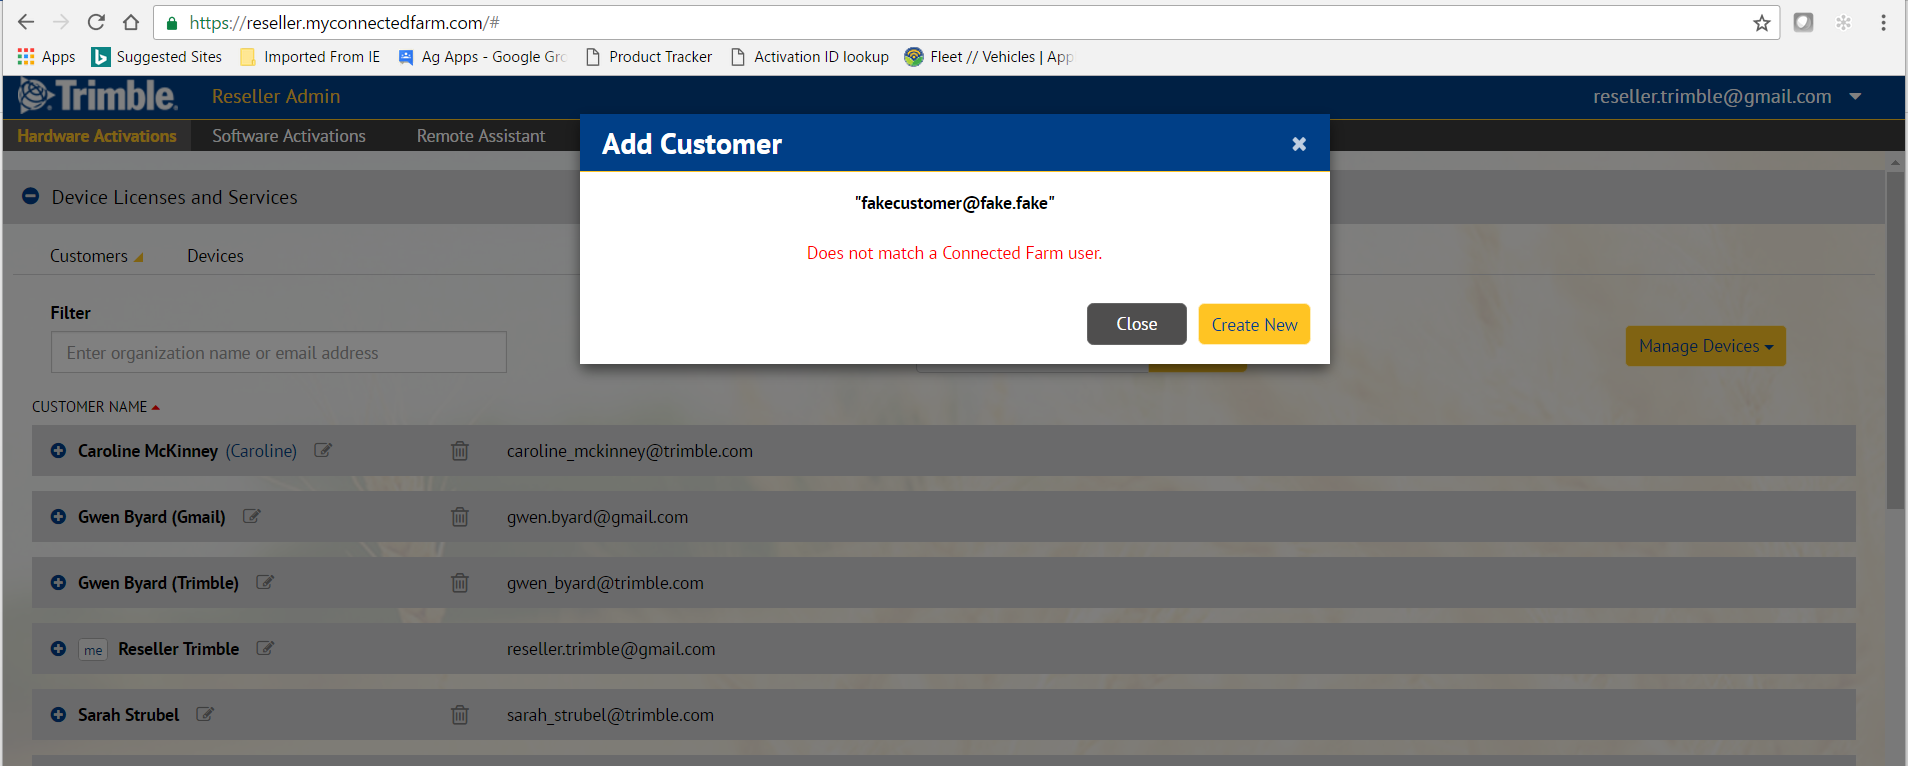
Adding a new customer
Note –The Ag Reseller Admin site supports a reseller hierarchy. Resellers who have sub-reseller partners can now view their sub-resellers and their sub-resellers’ customers on the Hardware Activations or Software Activations pages. Resellers who do
not have sub-resellers will not see a change in how they view their customers. Resellers can assign licenses to any device or organization visible to them in the Ag Reseller Admin site including sub-resellers and end customers.
- To add a customer, on theHardware ActivationsorSoftware Activationspage, enter the customer’s email address in theAdd Customerfield and then clickAdd:

- In theAdd Customerscreen clickAddagain to confirm adding the customer:
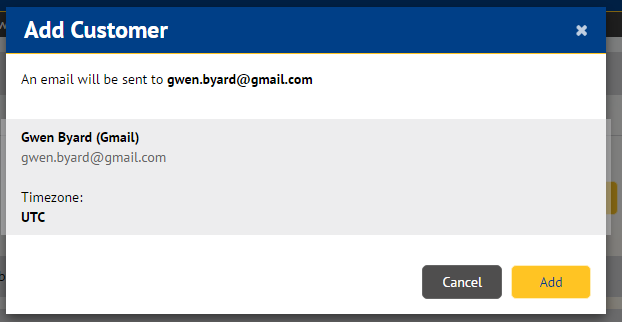 A confirmation message appears, stating that an email was sent to the customer and reminding them of the 5 day period within which the customer can accept.
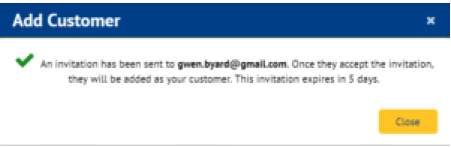
- When the customer receives the email inviting them to connect with the reseller, they can do one of the following:

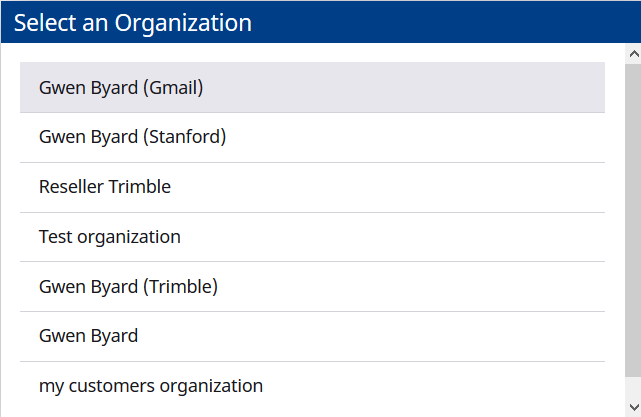
- ClickAccept. The customer is prompted to log in to their account and select an organization to connect with the reseller.
- Do nothing. The invitation expires in 5 days.
- ClickAccept. The customer is prompted to log in to their account and select an organization to connect with the reseller.
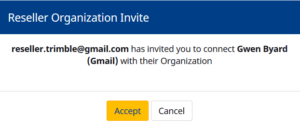
- After choosing an organisation, the customer sees the window confirming that they want to connect this organisation with their reseller. If they clickAccept, their organisation is connected to their reseller’s organisation, and the customer sees a confirmation window. If they clickCancel,there is no connection.
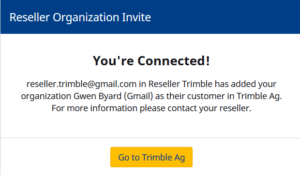 The customer also receives a connection confirmation email.
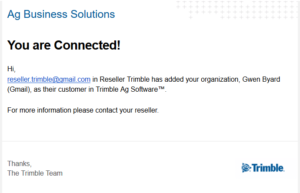 The reseller will now see the customer in their list of customers in the Reseller Admin site.
Note–If the email you enter is not associated with a Trimble Ag Software user, the name is not added. To create a Trimble Ag Software Account, clickCreate Newin the warning screen that appears. This opens the Trimble Ag Software Account screen, where you can create a new customer organisation and invite a customer to create a Trimble Ag Software account.
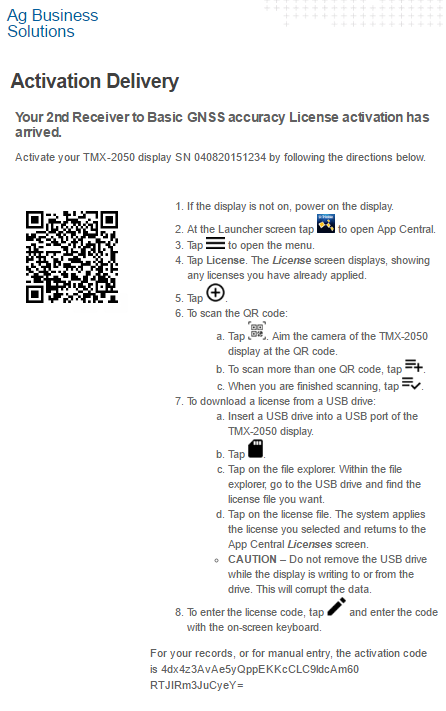
Delivering device entitlements
You can deliver device entitlements, for example, to send a customer their activation codes for their TMX-2050 display.
- In theCustomerspage of theActivationsscreen, open a customer folder (click the + sign) and then clickDelivernext to the item that you want to deliver. Alternatively, in theDevicespages of theActivationsscreen, clickDelivernext to the item that you want to deliver.TheDeliver Device Entitlementsscreen appears:
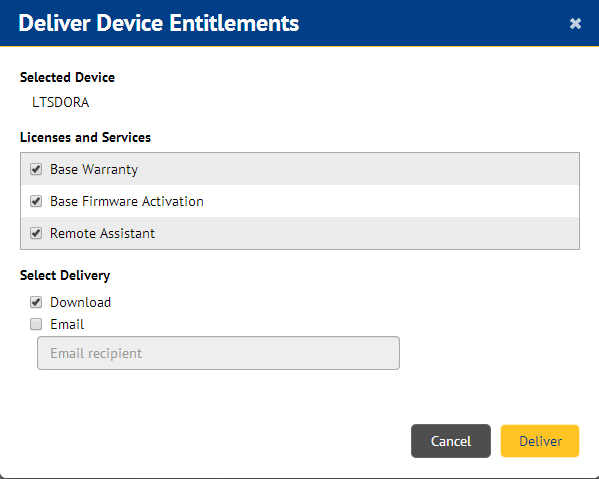
- Select or clear the check boxes next to theLicenses and Servicesto determine which elements will be delivered. The default is that all non-expired elements are selected.
- Select a delivery method. The options areDownloadorEmail:
- If you selectDownload, the Licenses and Services can be downloaded to a USB drive and then transferred to the TMX-2050 display.
- If you selectEmail, you must also enter an email address.
- ClickDeliver. A message, including both a QR code and an activation code, is automatically generated and sent to the email address you entered:

Transferring a device
Device Transfer lets the reseller move a device from their organisation to a customer’s organisation.
- In theCustomerspage of theActivationsscreen, from theManage Devicesdrop-down list, selectDevice Transfer:
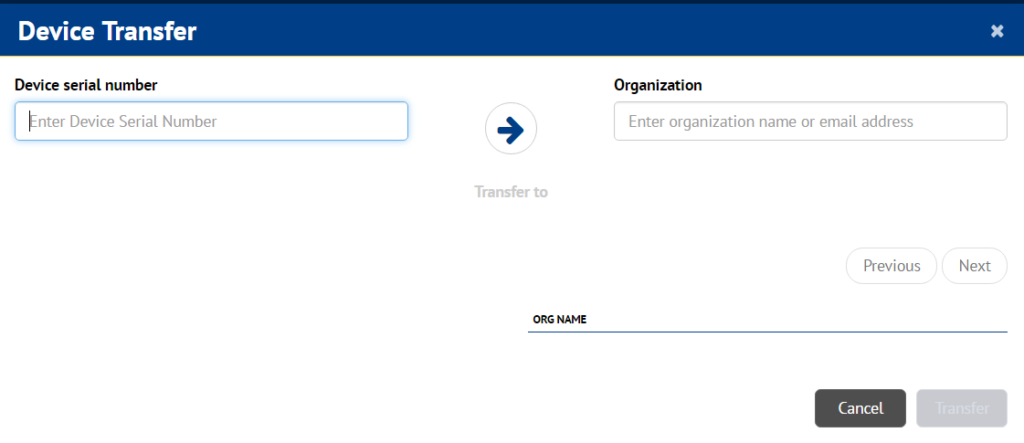
- Enter aDevice serial number. As you start typing the number, a list of options appears. Select the appropriate number.
- Enter aCustomername. As you start typing the name, a list of options appear. Select the appropriate name:
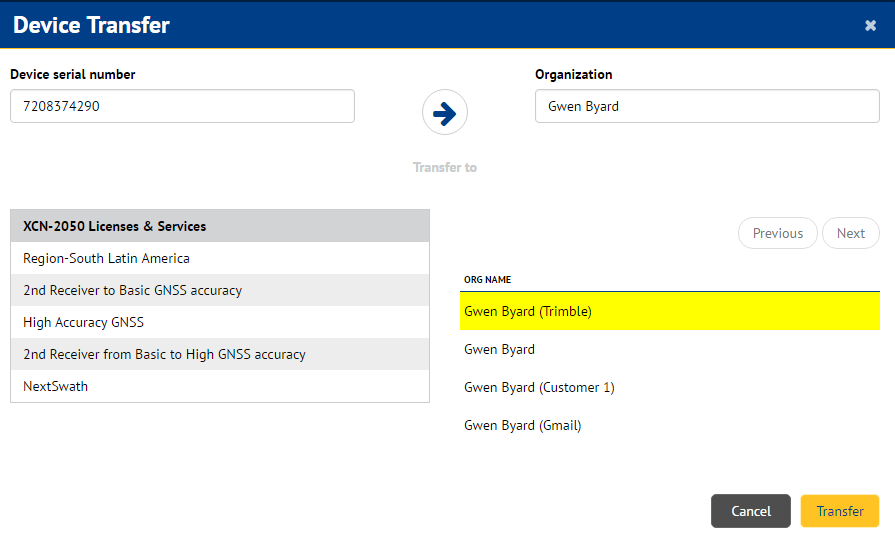 The Licenses and Servicesthat are associated with the device, as well as the email address of the customer appear on screen.
 - ClickTransfer.
Software Activations screen
 This screen allows you to access the following information: Description
| Item | Description |
|---|---|
| Customers | This section lists all the customers that you are associated with. If you expand an individual customer it will show all licenses assigned to that organization. |
| Land Forming Licenses | This section is for used to assign landforming software licenses to an organization. It shows all landforming licenses available to assign or transfer, and provides the tools to assign or transfer the license. |
| Farmer Pro/Pro Plus Licenses | A list of all available Farmer Pro/Pro Plus and other complementary licenses that are available for assignment to a customer or transferring to another reseller organization. |
| Desktop Licenses | A list of all available Desktop software licenses that are available for assignment to a customer or transferring to another reseller organization. |
In theSoftware Activationspage, sub-resellers and customers for an organization can be seen in theCustomerssection: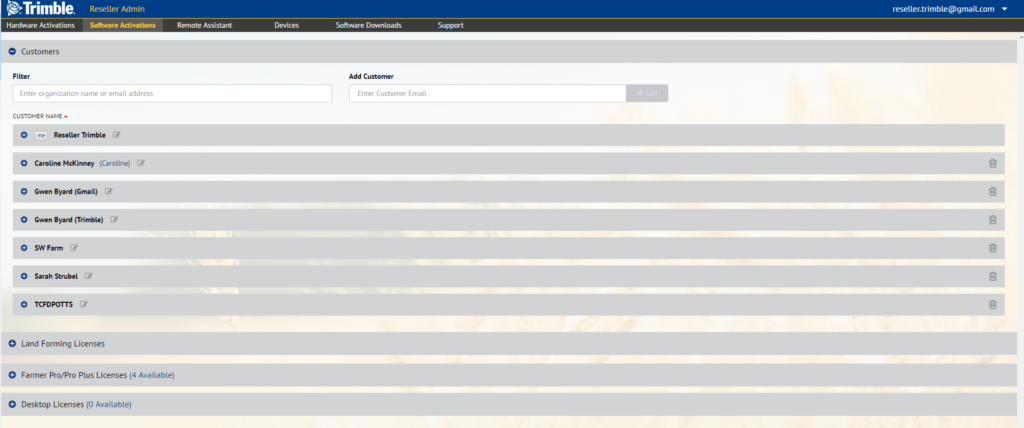 The terminology for assigning licenses has changed. Previously, a reseller clicked Transferto enable a feature – now they must clickAssignto enable a feature by assigning it to an organization.Transferis now used to move an unused license to a reseller organization, as is done on theHardware Activationspage:
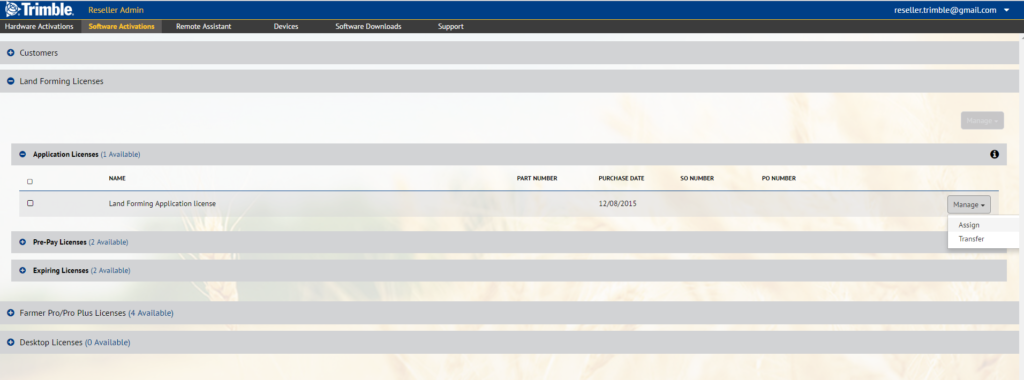
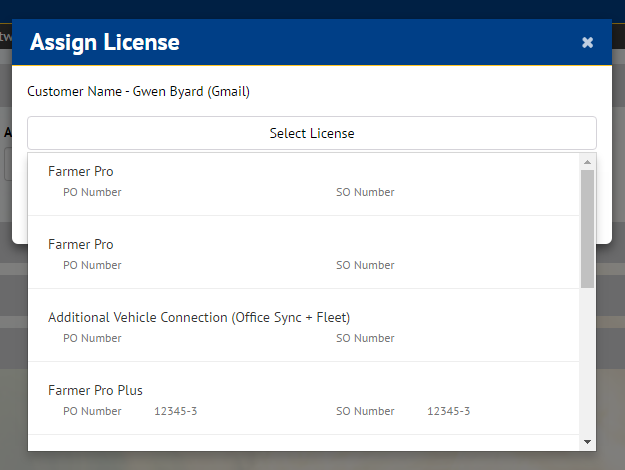
Assigning a license to a customer organization
- Expand theDesktop, Farmer Pro/Pro Plus orLand Forming Licensesnode to see a list of purchased bundles that are available to be assigned to a customer:

- Before you can assign a license to a customer, the customer must be added to theResellerorganisation. To view customers in the Reseller organisation, open theCustomerssection. If the customer does not appear on the list, enter the customer’s email address in theAdd Newfield and then clickAdd. The system will check to see if there is an account associated with that email address. If there is no account set up, you will be given the option to set up an account for the customer. SeeAdding a new customer
- To assign a license to your customer, return to the available licenses listing, clickManagenext to the license that you want to assign and then selectAssign.
- In theSelect Customer screen, choose a customer organisation from a list:
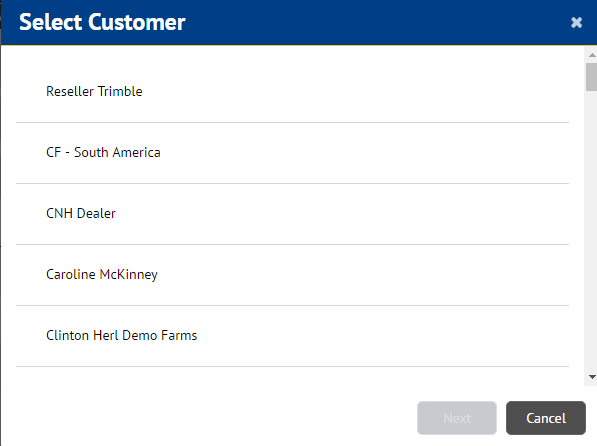
- Select an organization from the list and then clickNext.If successful, a confirmation message appears:

Note –Transferring a license does not activate the feature or “start the clock” on the license. Assigning a license to a device or an organisation activates the feature.
Assigning a license to a customer (customer-first workflow)
You can also use the following procedure to assign licenses:
- Select the customer you want to add the license to and expand the customer entry. ClickAdd:
- Select the type of bundle that you want to add:
- If you want to add vehicle connections, select the number of additional vehicle connections that you want to add on:
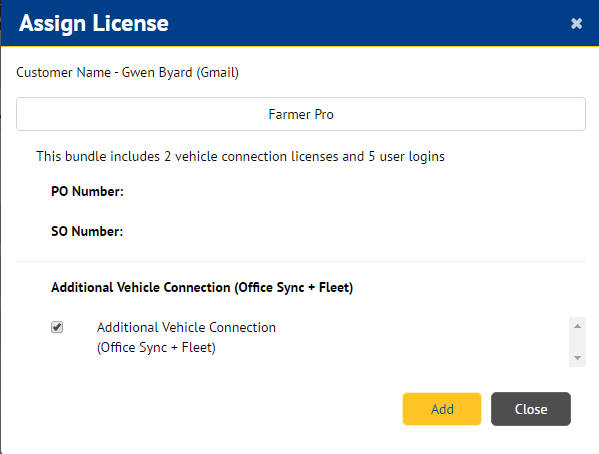
- Once you have chosen the licenses to assign, click Add.
Devices screen
TheDevicesscreen provides over-the-air updates to the DCM-300 modems that belong to your organisation or to your customers’ organisations: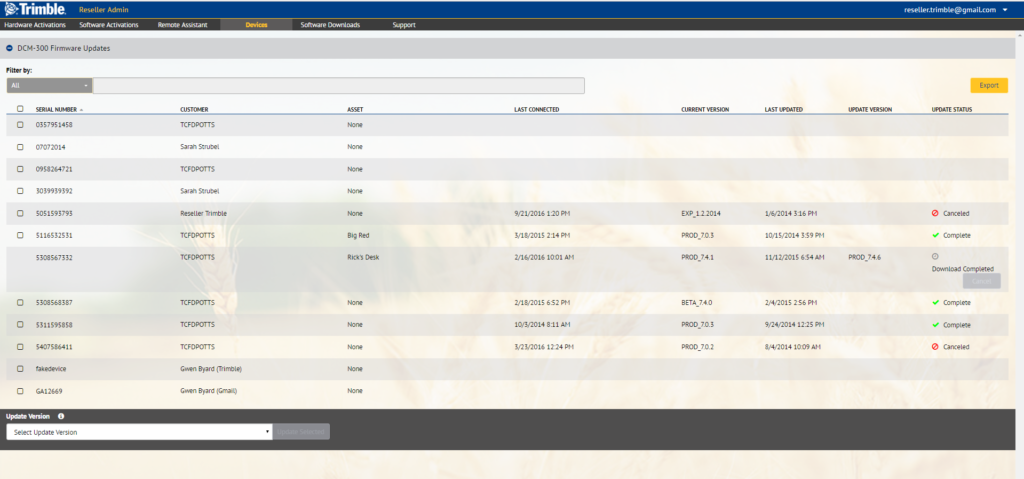 Description
| Item | Description |
|---|---|
| Last Connected | The day and date that the DCM-300 modem last reported information to the Connected Farm solution. |
| Serial Number | A list of all the DCM-300 modems. |
| Customer | The name of the customer (organisation). |
| Asset | The asset the device is associated with, if any. |
| Current Version | The current version of the product firmware. |
| Last Updated | The day and date that the DCM-300 modem was last updated |
| Update Version | The current update version for the particular modem. |
| Update Status | Whether the update is Pending (waiting for the customer to connect so that the firmware can be delivered), Complete (that is, the firmware was delivered successfully), or Failed. If the delivery failed, aRetrybutton appears, allowing you to redeliver the firmware. |
| Export button | Click to export all the data on the page to a csv file. |
Upgrading a DCM-300 modem
To start the OTA firmware upgrade process for a DCM-300 modem, make sure theDCM-300 Firmware Updatessection is open on theDevicespage.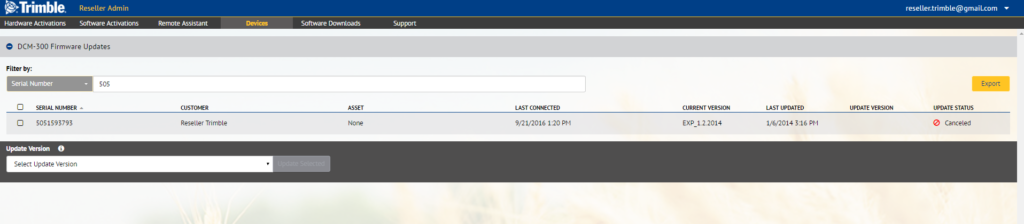 In this screen, all DCM-300 modems associated with the reseller’s organization or associated with the reseller’s customers’ organizations are shown. You can filter the DCM-300 modems on the screen byAll,Asset,Customer,Serial Number,Current Version,Update Version, orLast Connected. You can sort the modems bySerial Number:
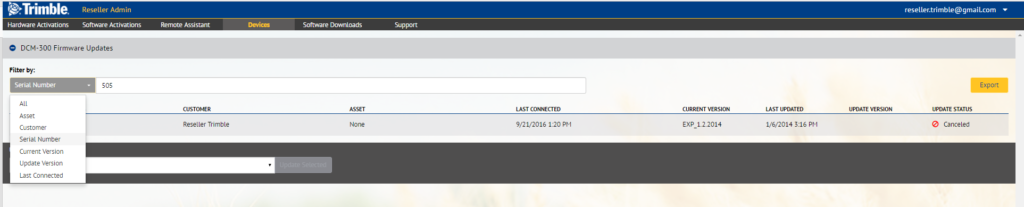 To update a device:
- Select the device by clicking the check box to the left of the deviceSerial Number, selectUpdate Version(near the bottom of the list) and then choose a version of Firmware to update to:
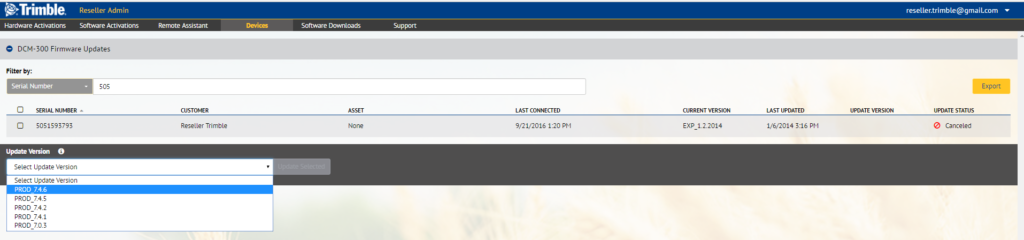
Note –You cannot downgrade devices using this tool – they can only be updated with their current version of firmware or higher.
- ClickUpdate Selectedto start the update. The update may be cancelled early in the update process by clicking theCancelbutton that appears in theUpdate Statuscolumn while it is permitted to cancel the update.
- If the update completes successfully,Completeappears in theUpdate Statuscolumn.
- If an update fails,Failureappears in theUpdate Statuscolumn. To retry the update, click theRetrybutton
The update process typically takes 30 minutes or longer to complete. If the firmware update process does not complete successfully, contact Trimble support.
Software Downloads screen
TheSoftware Downloadsscreen lists all the TMX-2050 software downloads and Landforming software downloads that are available and that can be downloaded to a laptop or desktop computer. Each package can be expanded to see a description of what it contains. For each software version, the screen shows the following information: Description
| Item | Description |
|---|---|
| Version | The version number |
| Description | A description of the software. If you click the + sign to the left of the version number, a more detailed description of the software appears. |
| Requirements | Lists whether there are any prerequisites for installing the software package. It also shows the size of the download. |
| Download | Click the button to start the download process. SeeDownloading a new version of the software |
| Include Beta Software Downloads | Also includes the Beta software releases. These can be downloaded in the same way as other releases. |
Downloading a new version of the software
- In theSoftware Downloadsscreen lists, clickDownloadnext to the version of theTMX-2050 or Landforming software that you want to download.
- TheSave Asscreen appears – navigate to the area on your system where you want to download the file to, for example, your desktop and then clickSave. The TMX-2050 software is downloaded as a .upx file, named in the format Device_SoftwareVersion, for example, TMX-2050_1.0.0.266.upx. The Landforming software is downloaded as a .zip file, named in the format Version_ProductName, for example, V10_WM-FormSoftware.zip.
Note –When the site displays Download on Device, this means that there is no downloadable package for the software. The software must be installed from the device.
- Once you have completed the download, the software package can be put on a USB drive and then installed on a display from the drive.
Remote Assistant screen (FmX integrated display only)
From theRemote Assistantscreen, you can start a Remote Assistant support session with a device that has an activated Remote Assistant service.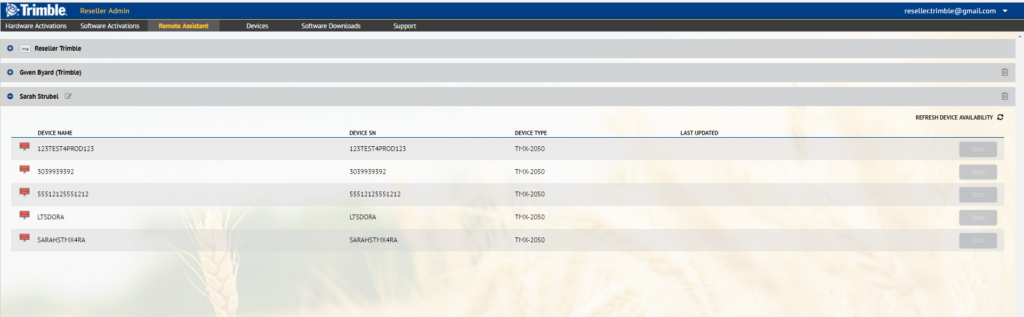 This screen shows the following information: Description
| Item | Description |
|---|---|
| Organisation (customer) names | A list of all the customers set up for Remote Assistance on the system. Click the + sign in front of the name to view a list of all the devices. |
| Device information | The following information is provided for each device enabled with Remote Assistant service:
ClickStartto start the Remote Assistant service for a particular device. Once the device is located, the following screen appears: Note:There can be a delay of up to 15 seconds after you clicked Start before this page appears. The user’s display screen now appears on your screen. You can use the View menu to change the resolution on your screen. |
| Refresh device availability | Click this option to update the devices. |
Irrigate-IQ Management
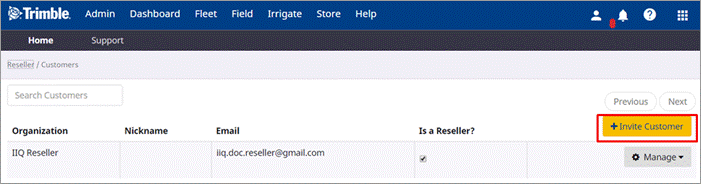
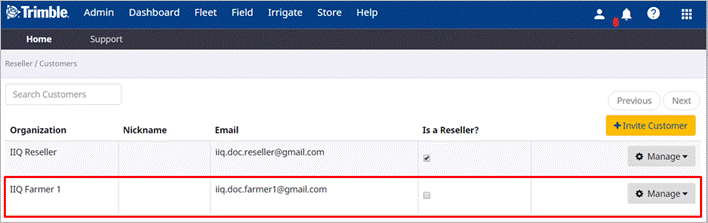
Adding a new customer organization
- ClickInvite Customeron the right-hand side of the screen:
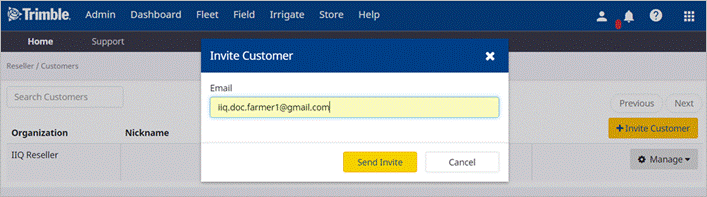
- In the dialog that appears, enter the email address of the customer and then clickSend Invite. The email address must be valid in order to send an invitation email.
- An email will be sent to the customer notifying them that you would like to add them as a customer. The customer must clickAcceptto accept the invitation and then log into Trimble Ag software to accept the invitation. They will then appear in your list of customers:
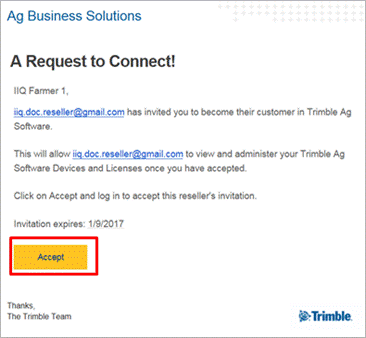
Note:The customer must follow this order of operations when accepting an invite: a) Log out of Trimble Ag Business software. b) Click ‘Accept’ in the email. c) Log into Trimble Ag Business software and then select the organization being invited. - Once the customer has accepted the invite, their organization (not the individual user) appears in your customer list.
 Note that the customer organisation will appear in the list, not the individual user. For more information, see theFrequently Asked Questionsbelow.
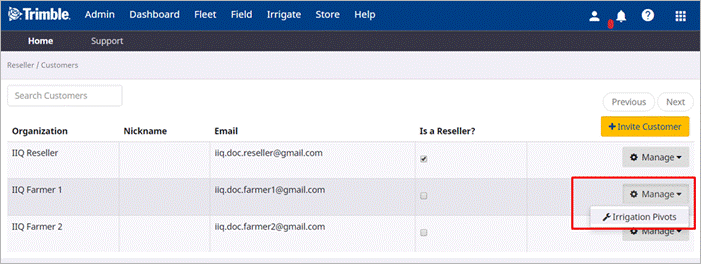
Adding a new pivot
- From the customer list, clickManageand then selectIrrigation Pivots. A list of pivots that are available to that customer appears:
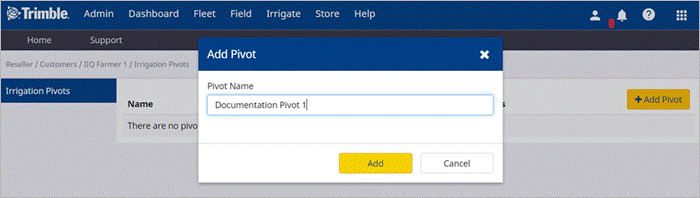
- ClickAdd Pivot:

- In the dialog that appears, enter a unique name for the pivot and then clickAdd:
The pivot name will appear in the pivot list along with its ID number, Date Commissioned, Commissioned Status, and a Manage button. At the same time, the pivot will be created on the Irrigate-IQ site.
The pivot list in Reseller Admin replaces the pivot list in the Irrigate-IQ software. To perform any functionalities on new pivots, ensure you do so from the Reseller Admin site.
Creating a pivot spreadsheet
- Download the latest pivot setup spreadsheet fromAgPartners.
- Click the Pivot& Span Setuptab:

- In the dialog that appears,Pivot Detailssection, enter the required information for the irrigation system into the yellow cells. It is recommended that you use a high-accuracy survey to determine the latitude and longitude of the center point.

- In theSpan Setupsection, enter the length (in feet) of the first span in theLength Ft field and then enter the number of consecutive spans that will follow the first with that same length in theQtyfield. Repeat for the remaining spans.

- Click theNozzle Setuptab:

- In the yellow cells, enter the following information for every nozzle along the length of the irrigation system:

- Span number: The span on which the nozzle is located
- Nozzle number: The consecutive nozzle number for the entire system.
- Distance (in feet): The distance of the nozzle from the system’s center
- Nozzle size: The value provided by the nozzle manufacturer relating to the nozzle size and color
- For the end gun (the final nozzle), enter “Gun” in column E:

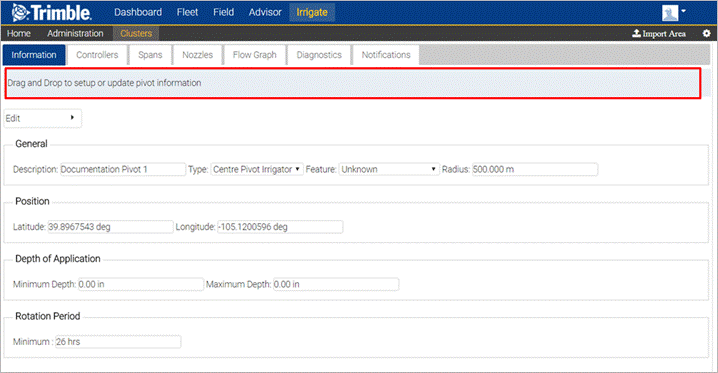
Setting up a new pivot
- From the pivot list, clickManagenext to the pivot you want to set up and then clickSetup:
 In the new tab that appears, you are directed to the Irrigate-IQ Admin site. The setup includes default information that you can upload to your pivot data.
 - Open the pivot setup spreadsheet and select thePivotDatatab:

- Press [Ctrl] + [A] to select the entire worksheet.
- Hover the mouse over the border of the selected area until the directional cursor appears. Click on the outlined box of the spreadsheet and drag the data into theDrag and Droparea. This will update the general pivot information, but excluding the name of the pivot.
- In the Pivot setup spreadsheet, select theNozzleDatatab:

- Press [Ctrl] + [A] to select the entire worksheet.
- Hover the mouse over the border of the selected area until the directional cursor appears. Click on the outlined box of the spreadsheet and drag the grey area on theNozzlestab. This will update the nozzle information.

- Once you have completed the setup, go back to the pivot list on theReseller Adminsite. This may mean that theIrrigate-IQtab closes, depending on your browser.
Editing pivot properties
- To edit the pivot properties, selectEditon theInformationtab:
 A dialog box appears, containing pivot details that were imported from the pivot setup spreadsheet.
- Edit the pivot details as required, selecting the tabs:
- Generaltab: Radius and Feature type.
- Positiontab: Verify the Latitude and Longitude (in decimal degrees) of the irrigation system’s center, and edit these values if necessary.
- Depthtab: Verify the Minimum and Maximum depth, and edit these values if necessary.
- Rotationtab: Verify the minimum Rotation period (in hours) and the maximum Application depth, and edit either of these values if necessary.
- If you have a wedge shaped pivot, enter the start and stop angles of the irrigation system (in degrees). An angle of 0 (or 360) degrees points the pivot in the northern direction.
- Pumptab : Enter the Maximum and Minimum pump flow and the Maximum pump pressure. This information is used to calculate the flow graph.
- Controllertab: Select the controllers that regulate the irrigator control and status and the irrigation system bearing.
Adding Overhangs and Corner Arms
- Select theSpanstab, and then in the last span, click theEdit the span configurationicon.
 The Span Details dialog box appears.
- From theTypedrop-down list, select the required span type:
- Span
- Overhang
- Corner arm
- Span (with overhang)
- Corner arm (with overhang)
- Leading corner arm (with overhang)
- TheLength (m)field displays the total length of the final span, including the overhang. TheWheel Base (m)value displays the same length by default. For a span or corner arm with an overhang, you must change theWheel Basevalue to the length of the final span in between its towers, excluding the overhang. Enter the value and then clickSave.
- If you have a pivot with a corner arm, you must input the corner arm path: a. Create a spreadsheet that contains the points of the corner arm path (in latitude and longitude).
 b. Navigate to theInformationtab, select theEditmenu, and selectEdit Corner Arm Path.
 c. A dialog box opens for the corner arm path. Click theCoordinatestab:
 d. Select all the points on the corner arm path spreadsheet and drag and drop that information into the text in theCoordinatestab:
 e. The corner arm coordinates is updated. SelectSave.
Configuring a controller
- Navigate to theControllerstab.

- Click the Add Controllerbutton.

- In theAdd an Irrigate-IQ Controllerdialog, select the controller Type and Location and then clickAdd.

Note –It is recommended to always use theOn the pivot centreoption. Selecting theOn a spanoption will cause the system to only use Valve Control Modules from that span outwards. Any modules inside that span will be ignored.The controller is added to the list:
- For RMC-100 controllers, click theAddbutton again to add an IQL-200 module.
- In the Add Sub-Controllerdialog, add the IQL-200 module and location, and then clickAdd:
 The IQL-200 is added to the list of controllers:
 The following information and options are available for each controller:
Column Header Button Description Description Controller name Version Controller version Address Controller IP address Span Position of controller on the irrigation system span Misc 
Configure the XBee radio.Once configured, do not adjust the configuration. Schedule 
Publishes the currently active scenario to the live irrigation system as a schedule Nozzle Nodes 
Upgrade the valve control module firmware. If the system is online, the firmware will be updated when you click the button. 
Edit the valve control module IDs. This will initially be done in the field. Config Set configuration. Edit the irrigator controller. Diagnose 
Nozzle diagnostics. Diagnostic mode is a method for verifying the proper operation of the nozzles. Info 
TheController Informationdialog displays version information about the firmware and the boot loader. 
ThePing Controllerdialog appears with information on the time taken to ping the controller at a given IP address. 
Manage 
Upload the latest boot loader. In theTransfer boot loader imagedialog, clickTransferto upload the boot loader. 
Upload the latest firmware. In theTransfer firmware imagedialog, clickTransferto upload the firmware. 

Reset the controller.
Managing the valve control module
- Below theNozzle Nodescolumn header, click.
- In thePivot Reportdialog, do one of the following:
- ClickScanto obtain the valve control module IDs of each outlet along the irrigator. These IDs are originally set in the field.
- ClickEditto change the valve control module ID values and make the necessary edits.
- ClickNextto confirm the valve control module IDs.
- ClickFinish
Editing the irrigator controller
- Below theConfigcolumn header, click. TheEdit Controller Configurationdialog appears.
- Click on the tabs to make any required changes and then clickSaveto exit from the dialog.
Tab Description Network ●IP Address: Enter the IP address of the controller. ●GPRS Communication Enable: Select the check box to enable cellular data transfer. Bearing ●Boom Bearing Determination: Select the GNSS method used to determine the irrigator bearing.Note:Only the Boom Bearing Determination setting is required for the following feature types: Monitor/Control, Variable Rate Irrigation, Optimal Flow – Classic, Optimal Flow – VRI and Uniform Corner. ●Corner Arm Bearing Determination: Select the GNSS method used to determine the corner arm bearing.Note: If either bearing is determined via an external GNSS on the cable, the GNSS antenna’s serial number must be entered. Control ●Pivot Manufacturer Information: Select the irrigator controller’s manufacturer. ●XBee ID: Enter the ID of the controller.Note:This must be a 16-digit value. If the ID provided has less than 16 digits, pad the front of the ID with the necessary number of zeros. For example, if the ID provided is 12345678901234, add two 0s to the front and enter the ID as 0012345678901234. Relays To configure a new relay: 1. Click  . 2. In theEdit Relay Configurationdialog, select the controller’s identifier and type. 3. If you select a Schedule type, enter a valve index. 4. ClickSave. Once you have created the new relay, the following options become available: ● Clickto edit the relay. ● Click
  to delete the relay.
Pumps To configure a new pump: 1. Click . 2. In theEdit Pump Configurationdialog, enter the following: Description, Type, Minimum flow (liters/minute), Maximum flow (liters/minute), Control Interface, XBee radio. 3. ClickSave.Once you have created the new pump, the following options become available: ● Click to edit the pump ● Click to delete the pump.
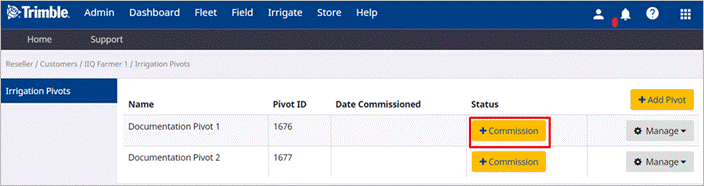
Commissioning a pivot
- Navigate to the pivot list for the pivot you would like to commission and then clickCommission:
This will run the diagnostics for the pivot and outline the numbers of failures, warnings, notices, OK’s, or insufficient data: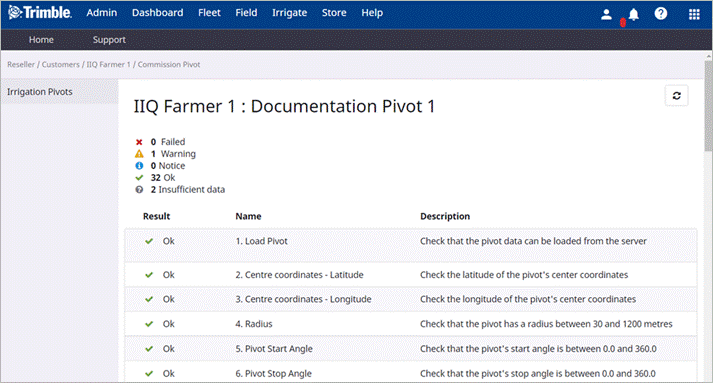
- If there are any failures, you will be unable to commission the pivot. This requires you to revise the setup of the pivot and fix the errors. If there are no failures, you can commission the pivot. Scroll to the bottom of the diagnostics list and clickCommission:

You will be directed back to the pivot list. TheStatuswill change to Commissioned, and theDate Commissionedwill display the current date.
Please note that the pivot will not appear in your customer’s list on the Irrigate-IQ software until the pivot has been marked asCommissioned. This will also be used for the warranty start date.
Importing a Shapefile
- Navigate to the pivot list for the organization you would like to import the shapefile to and select Manage.Then selectImport Areas:

- In the Import dialog, select an area type from the drop-down list:

- ClickChoose…for each file type and find the file you would like to upload.
 You must do this for the following data files: .shp – Required .dbf – Required. The Description of the area will be named according to the following columns within the .dbf file (Name, ID, Zone, Rate). If none of these columns exist, each area will be given a unique ID. .shx – Required .prj – Not required if your data is in WGS84 coordinates.
 - When you have chosen all files, clickImport.

Your data will then be validated and a success message will appear:
- Go back to the pivots and view your areas within the UI.